Graphic Design 101: Forget Selection Tools, Try This Instead

Often times when working on graphic design projects of any kind, you can be expected to work with a variety of photos and you may be expected to take only a portion of an image and put it into a separate piece or photo. For the most part, we are taught to accomplish this by using the direct selection tool or the lasso tool in Photoshop, but those tools can be difficult to use and imprecise in terms of how well they are able to successfully select pieces of different photos, especially if those photos don't have clear outlines and changes in lighting and color around the item(s) you are trying to select.
To avoid the headaches and frustration that these tools can cause, try using a clipping mask instead.
To help illustrate this process, this is the photo I will be using:

image credit: unsplash
I will be selecting the building in the center of this photo and placing it into another photo using a clipping mask.
1) Add a clipping mask

Go into your layers panel on photoshop once you have your photo of choice open and click the little button at the center on the bottom of the panel that looks like a white rectangle with a hole in it.
Once you click it, a white rectangle will appear next to the photo's preview/icon in the layers panel. This is the clipping mask's preview/icon (note that the mask is invisible and is only affecting the properties of the photo that it is applied to):

2) "Paint" on the clipping mask
This is arguably the hardest part of clipping masks to understand. When you use a clipping mask and have it selected in your layers panel, you can "paint" on it using black or white. If you "paint" using black, then you "erase" the part of the photo that you "painted" black. Additionally, if you "paint" the mask, then the image that was once invisible because of the "black" clipping mask will become visible. This makes it so that if you make any mistakes while "erasing" the background and other objects in a photo, you can bring them right back by making the brush "white" on the clipping mask and "painting" over where you made the mistake.
You can see a sample of where you have "painted" on the clipping mask on it's preview in the layers panel as seen here along with some areas that are circled that are important to pay attention to:

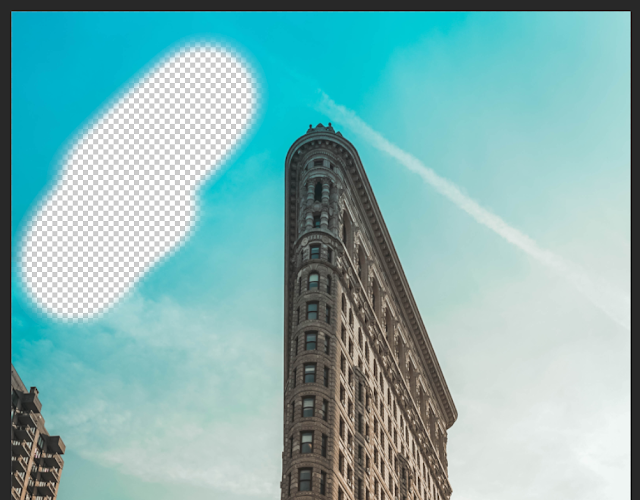


A) The area of the photo in which I have "painted" black on the clipping mask, rendering that portion of the photo to not appear to be visible anymore.
B) The color I have selected is shown here. When you're using a clipping mask, you want to use pure black and white almost exclusively, so keep an eye on this section of the screen so that you're using the right color every time you go to "paint" on the clipping mask.
C) This is the tiny preview of the clipping mask on the layers panel. As you can see, it looks as though it has been "painted" black in the same area as I have "painted" on the photo that I am editing. Looking at this portion of the screen can help you keep track of where you have and haven't "painted" when using the clipping mask and help you see how much you have "painted".
Other Properties Of Clipping Masks
1) You can make your brush and its strokes smaller and larger and appear softer or harder when "painting" with them by adjusting the settings on the brush tool's setting panel:

When you soften the stroke of the brush, you make the edges of every stroke appear slightly fuzzy and less harsh. The harder you make it, the more defined each of your strokes will be.
Here is what it looks like when I turn the brush's hardness down to 50%:

It is a relatively subtle effect, but it can make the brush very forgiving and can make it feel much easier to select an object using the clipping mask because the edge is less harsh.
2) You can adjust the opacity of your brush strokes when using a clipping mask.
When you turn down the opacity of your brush, you decrease the severity of the tool on your photo and can "erase" less of the photo away, leaving some of it's appearance behind in a translucent state.

As can be seen in this example, I turned the opacity of my brush down to 50% and now I have only slightly "erased" the photo. You can still see the color of the sky but it is by no means completely invisible.
This trick along with adjusting the hardness of the brush can be extremely useful when blending two or more different images together so that the lines of each image are less harsh so any borders between photos are less noticeable. This combined with editing the colors of photos, highlights, shadows, and other details can render it impossible to tell that two or more photos were ever separate to begin with!
3) You can "bring back" parts of a photo that you used a clipping mask on AFTER adding it to another piece or photo in photoshop.
I have brought the photo I was using in the earlier examples into another document that has a different photo. As you can see in this screenshot, the clipping mask is still very much intact on the original image that I was editing:

As long as this is remains in place, I can continue to edit the mask and add and subtract elements of this photo to this piece as much as I want. So, let's say I want to bring back some details of the photo and add them to this piece. All I have to do is select the clipping mask, change my brush to white, and "paint" the mask where I want the photo to be visible again:

And once again, I can see where I have and have not "painted" on the photo's mask in the layers panel.
Like I said before, this can be a really tricky concept to grasp in terms of how clipping masks work. It is something that is often best understood by watching someone do it in real time. With that said, there are other ways to use clipping masks as well that are very powerful and you can learn all about these different methods through watching various videos on YouTube.


I wish someone taught me this when I took my desktop publishing class. I honestly had so many problems with that tool that now I refuse to use it. But maybe with more tips from your blog I'll get more comfortable with adobe apps (:
ReplyDelete